So you have purchased, or are looking to purchase, the standalone hot tub of your dreams! Wiring it yourself is a big task, and can be dangerous, but being informed can help you decide if you are ready for this next big adventure.
Can Your Main Electrical Box Handle the Load?
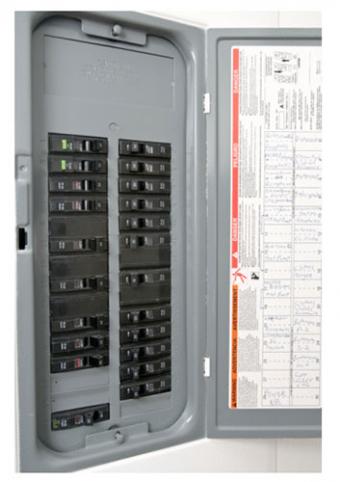
The main electrical box is a grey metal containment set flush with the wall usually out of sight somewhere in your house and controls all the power coming into your house. Each breaker represents a zone of power that has been calculated by an electrician according to the NEC code to support that zone's electrical needs and combining zones to free up a breaker is a bad idea.
Spare breakers should be marked but many contractors don't supply spare breakers during construction so look for blank cover plates. Depending on how many blanks you have will determine the power capacity of your hot tub.
- One blank - 110 volt hot tub capacity
- Two blanks - 110 or 220 volt hot tub capacity
If every space is filled, you will need to call an electrician to install either a larger main breaker box or a second box before you go any further. If it does come to this, though, you may as well have them wire the hot tub. The cost of labor for the added work would be negligible.
110 Versus 220 Volt Spa
The benefits of a 220 hard wired spa out-weighs the ease of a 110 plugged spa since power, size, and additional options make for a more comfortable experience. The plugged end of a 110 spa is more convenient for installation since one outside outlet can easily be made into a dedicated circuit, but without the additional buffer of the spa panel you may have false ground fault trips which would be inconvenient when entertaining.
How to Install a Dedicated Spa Panel
This tutorial covers installation of a 220 volt spa in a single story home with no basement and a main breaker panel located in an attached garage for simplicity.
Previous Electrical Experience Necessary for Safe Installation
An open breaker panel is a live direct feed from the grid. A short would likely take out the entire neighborhood before a safety is tripped and that short could result in an arc flash or blast that will have you calling more than an electrician for repairs! Please make sure you have successfully direct wired a garbage disposal, dishwasher, water heater, or any appliance with an existing breaker prior to attempting this task.
Before You Begin
Before you go further check your local building codes to see if you need to pull a permit for outside work. Chances are you probably will.
According to code you need to install a disconnect on the outside of the house by the spa called a spa panel. Locate the spa panel above the edge of the spa at least five feet away and within sight of the spa for safety. The spa panel GFCI circuit creates a buffer between the hot tub and the breaker to reduce any false breaker trips during operation. As with any electrical project, you will need a helper for this task.
Tools
- Drill with bits
- Screwdrivers
- PVC pipe cutter
- Hammer
- Wire cutter/stripper/crimper
- Voltage meter
- Channel lock pliers
- Caulking gun
Materials
- Double pole circuit breaker
- 12 gauge wire in four colors red, white, black and green
- PVC 1/2" pipe and bulkhead fittings
- Liquidtight 1/2" flexible conduit and fittings
- Spa panel enclosure
- PVC glue
- Wire crimps
- Screws
- Zip ties
- Waterproof caulk
Installation Process
The following steps will take some time so keep fridges/freezers closed and advise household of power loss.
- Go outside to preferred spa location.
- Disassemble spa panel enclosure. Use spa panel frame to measure and mark holes on outside of house a minimum of five feet but within sight of the spa.
- Drill holes at marks and mount panel frame to wall with screws. Use hammer to remove top knock-out of panel frame and loosely insert PVC bulkhead fitting into panel.
- Measure length of PVC pipe from bulkhead fitting to eve of house and drill hole in eve for pipe entry.
- Cut pipe 1 inch longer than measurement and insert top of pipe into eve and bottom into fitting. Glue PVC connection at panel and tighten bulkhead connection. Seal eve entry with caulk.
- Push white, green, black, and red wires into conduit fitting and feed wire into attic. Have helper catch wires in attic and secure with zip ties so the wires don't fall back out.
- Go to breaker panel in garage.
- Turn off main power breaker. Remove main panel cover to expose breakers and house wiring.
- Warning! Incoming power lines are still live! Use voltmeter to locate hot wires entering house, largest wires in panel, and mark on insulation.
- Knock out 2 panel blanks in removed cover to fit over new breakers and 1 top of panel knockout for PVC bulkhead fitting. Loosely insert fitting into top of panel.
- Measure area from bulkhead fitting to ceiling and drill hole in ceiling directly above. Cut PVC pipe 1 inch longer than measurement and insert top of pipe into ceiling and bottom into fitting. Glue PVC connection and tighten bulkhead connection.
- Go into attic.
- Pull wire through attic from spa panel conduit and position by main breaker panel conduit above garage.

Secure liquidtight fitting - Go into garage and have helper push wires down conduit from attic. Once wires appear in conduit opening, have helper stop pushing and slowly pull the wires down and away from live household feed until they reach the bottom of the main breaker panel.
- Route wires carefully through main panel aligning red and black to new breaker positions, white wire to neutral bar, and green wire to ground bar. Strip each wire and insert into connection and new breakers and tighten lug with screwdriver.
- Ensure new breakers are off and secure to the buss bar. Route excess wire to sides of main breaker panel and secure with zip ties to prevent interference with breakers.
- Reinstall main panel cover adjusting fit for new breakers. Ensure new breaker remains off and turn on main breaker to resume household power.
- Go outside to spa panel location.
- Cut wire entering conduit from spool 10 inches long for each red, green, black, and white. Strip sheathing and attach red, black, and white wires to GFCI in spa panel and green to ground lug. Ensure spa breaker is off. Do not close box.
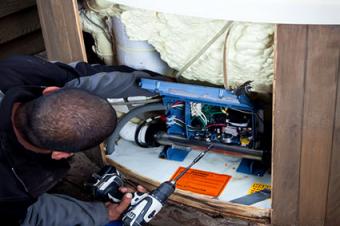
- Use hammer to knock out fitting hole in spa panel bottom and spa power box on new spa. Secure liquidtight fitting using pliers in both boxes.
- Measure liquidtight pipe to fit between fittings, adding length for ground run or burial if needed, and add an extra 12 inches to reduce stress on pipe. Cut pipe.
- Push all wires from red, green, black, and white spools through spa panel fitting first, liquidtight pipe second, and spa power box fitting third and terminate to spa according to manufacturer specifications.
- Push pipe with wires into both fittings and secure both fittings using pliers. Close spa power box.
- Cut wire entering conduit from spool 10 inches long for each red, green, black, and white. Strip wire ends and attach to corresponding wire in panel GFCI. Assemble spa panel.
- Return to garage.
- Apply power to main panel breakers.
- Go outside to spa panel.
- Check spa has power then turn off spa panel breaker before filling with water.
- Enjoy!
Have Your Work Inspected
Make sure you do a presentable job both electrically and cosmetically because you'll need to get your work inspected, but the inspector isn't just there to check your work. They also add the improvement to your property increasing the value of your home.
Even if the inspector fails your wiring, s/he will explain what needs to be done for it to pass, so don't fear the inspection. Plus, it's always safer to have a second set of eyes when it comes to electricity.
Save


